UIKit предоставляет чрезвычайно неудобные методы для покомпонентной работы с цветом. Такие вещи, как изменение яркости или перевод в градации серого требуют слишком много действий.
Чтобы упростить процесс, мной был создан класс ColorModel, позволяющий управлять основными компонентами цвета в максимально понятном виде — через свойства. Вдобавок корректируются ситуации обнуления оттенка и насыщенности.
import UIKit

/**
The `ColorModel` class provides simple mechanism for modeling color by components.
*/
class ColorModel {

    // MARK: - Properties
    /**
    The internal flag to prevent loops: changing the components
    changes color and brings components updating.
    */
    private var needsUpdateColor = true

    /**
    The `UIColor` associated with the model.
    */
    var color: UIColor! {
        didSet {
            updateComponents()
        }
    }

    // MARK: RGB
    /**
    The red component. Value between 0.0 and 1.0.
    */
    var red = CGFloat() {
        didSet {
            if needsUpdateColor {
                color = UIColor(red: red, green: green, blue: blue, alpha: alpha)
            }
        }
    }

    /**
    The green component. Value between 0.0 and 1.0.
    */
    var green = CGFloat() {
        didSet {
            if needsUpdateColor {
                color = UIColor(red: red, green: green, blue: blue, alpha: alpha)
            }
        }
    }

    /**
    The blue component. Value between 0.0 and 1.0.
    */
    var blue = CGFloat() {
        didSet {
            if needsUpdateColor {
                color = UIColor(red: red, green: green, blue: blue, alpha: alpha)
            }
        }
    }

    // MARK: HSB
    /**
    The hue component. Value between 0.0 and 1.0.
    */
    var hue = CGFloat() {
        didSet {
            if needsUpdateColor {
                color = UIColor(hue: hue,
                                saturation: saturation,
                                brightness: brightness,
                                alpha: alpha)
            }
        }
    }

    /**
    The saturation component. Value between 0.0 and 1.0.
    */
    var saturation = CGFloat() {
        didSet {
            if needsUpdateColor {
                color = UIColor(hue: hue,
                                saturation: saturation,
                                brightness: brightness,
                                alpha: alpha)
            }
        }
    }

    /**
    The brightness component. Value between 0.0 and 1.0.
    */
    var brightness = CGFloat() {
        didSet {
            if needsUpdateColor {
                color = UIColor(hue: hue,
                                saturation: saturation,
                                brightness: brightness,
                                alpha: alpha)
            }
        }
    }

    // MARK: Grayscale
    /**
    The grayscale component. Value between 0.0 and 1.0.
    */
    var white = CGFloat() {
        didSet {
            if needsUpdateColor {
                color = UIColor(white: white, alpha: alpha)
            }
        }
    }

    /**
    The opacity component. Value between 0.0 and 1.0.
    */
    var alpha = CGFloat() {
        didSet {
            if needsUpdateColor {
                color = color.colorWithAlphaComponent(alpha)
            }
        }
    }

    // MARK: - Initialization
    init(color: UIColor) {
        self.color = color
        updateComponents()
    }

    // MARK: - Main
    /**
    Updates the color components.
    */
    private func updateComponents() {
        var newHue = CGFloat()
        var newSaturation = CGFloat()
        var newBrightness = CGFloat()

        needsUpdateColor = false

        color.getRed(&red, green: &green, blue: &blue, alpha: &alpha)
        color.getWhite(&white, alpha: nil)

        color.getHue(&newHue,
                     saturation: &newSaturation,
                     brightness: &newBrightness,
                     alpha: nil)

        // Handling the reset hue to 0 when the brightness and saturation are set to 0
        if newBrightness != 0 && newSaturation != 0 {
            hue = newHue
        }

        // Handling the reset saturation to 0 when the brightness is set to 0
        if newBrightness != 0 {
            saturation = newSaturation
        }

        brightness = newBrightness

        needsUpdateColor = true
    }
}
Скачать ColorModel.zip
UITableView — это компонент интерфейса в виде одноколоночной таблицы, преимущественно служащий для отображения и редактирования списка данных.
При создании ему задается один из двух стилей: Plain или Grouped. Разница в представлении заголовков и нижних колонтитулов секций.
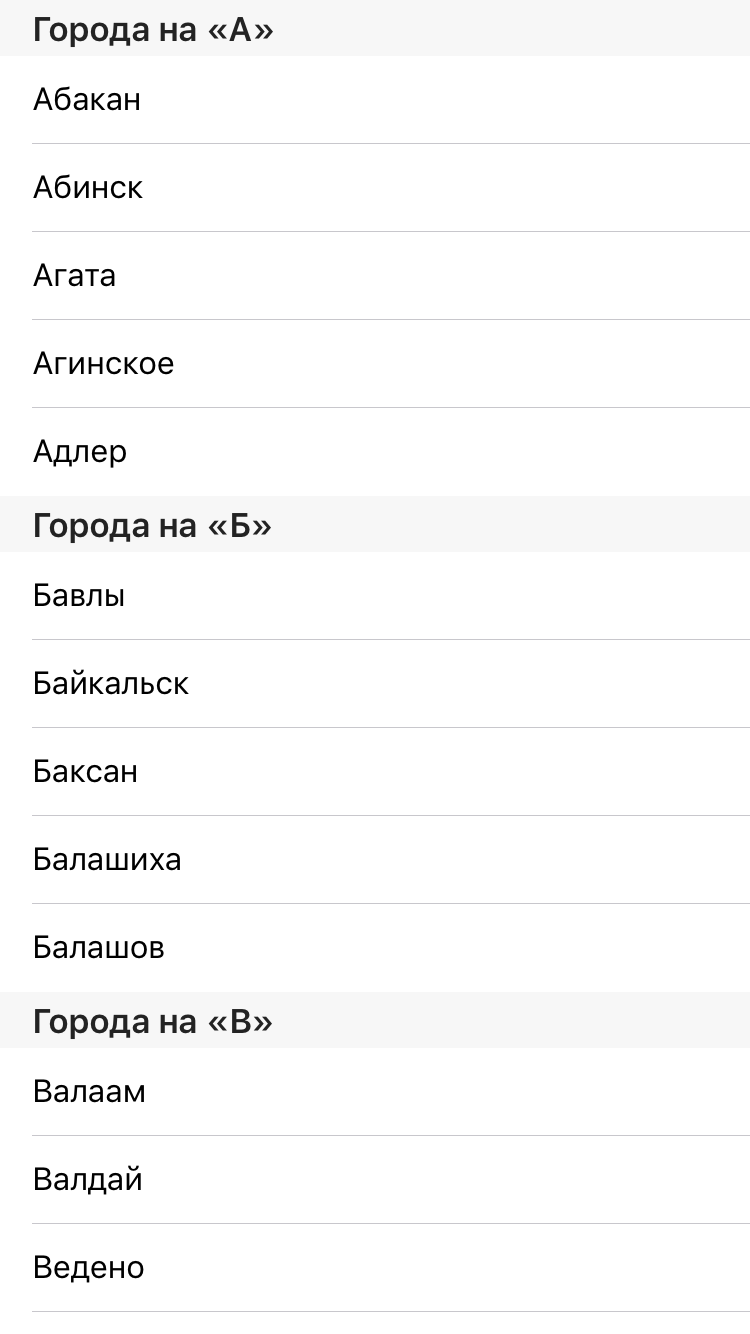
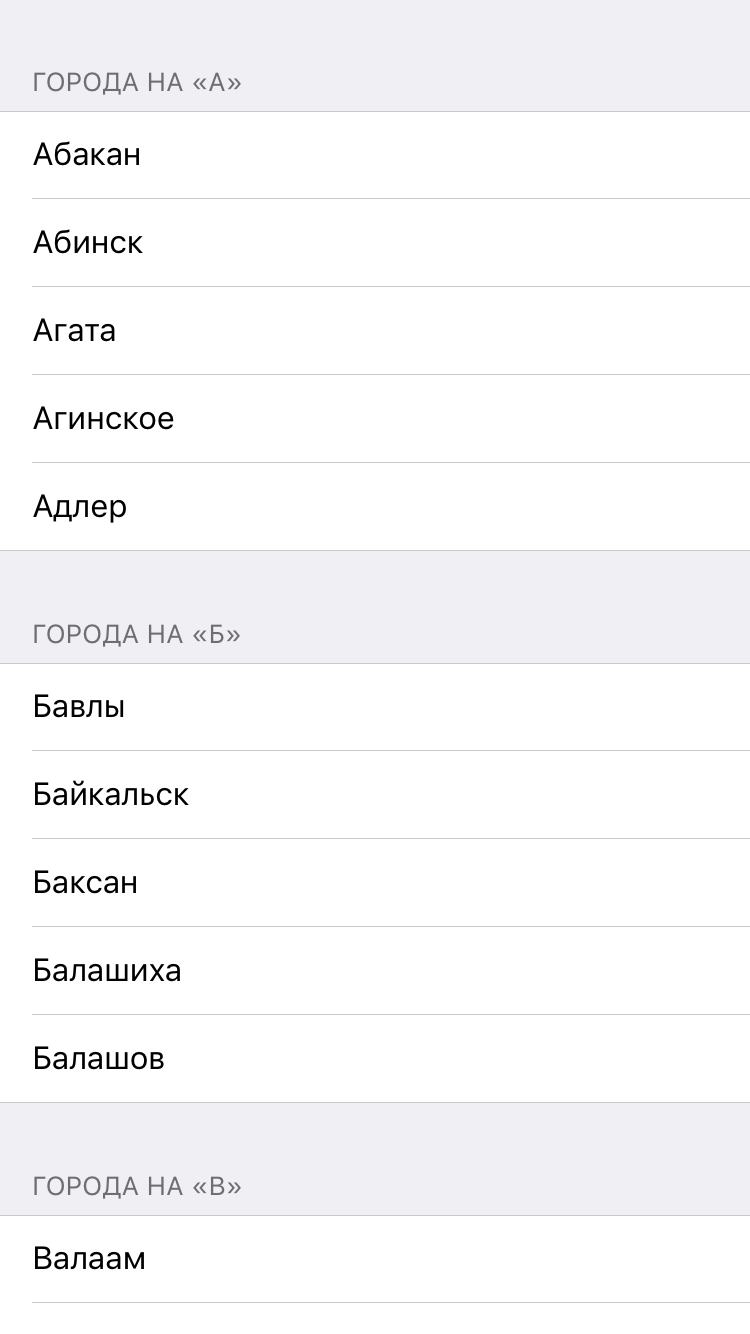
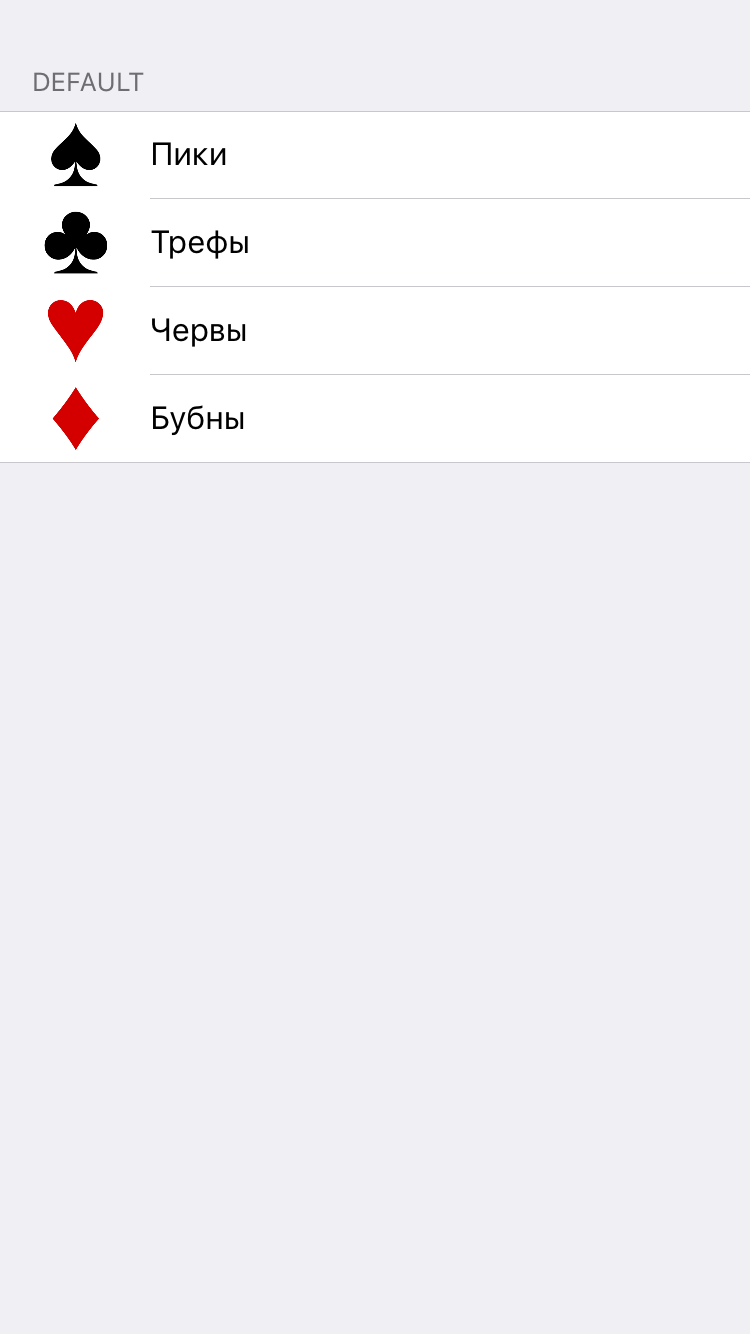
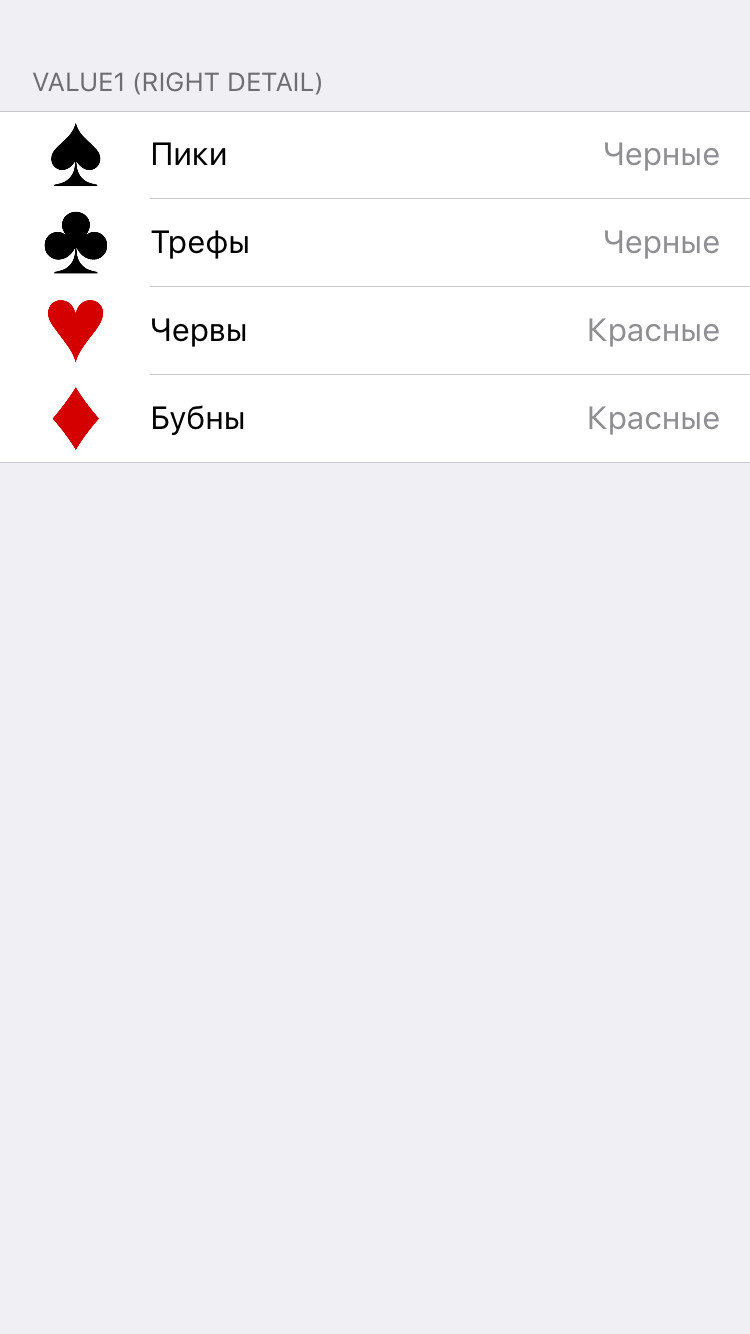
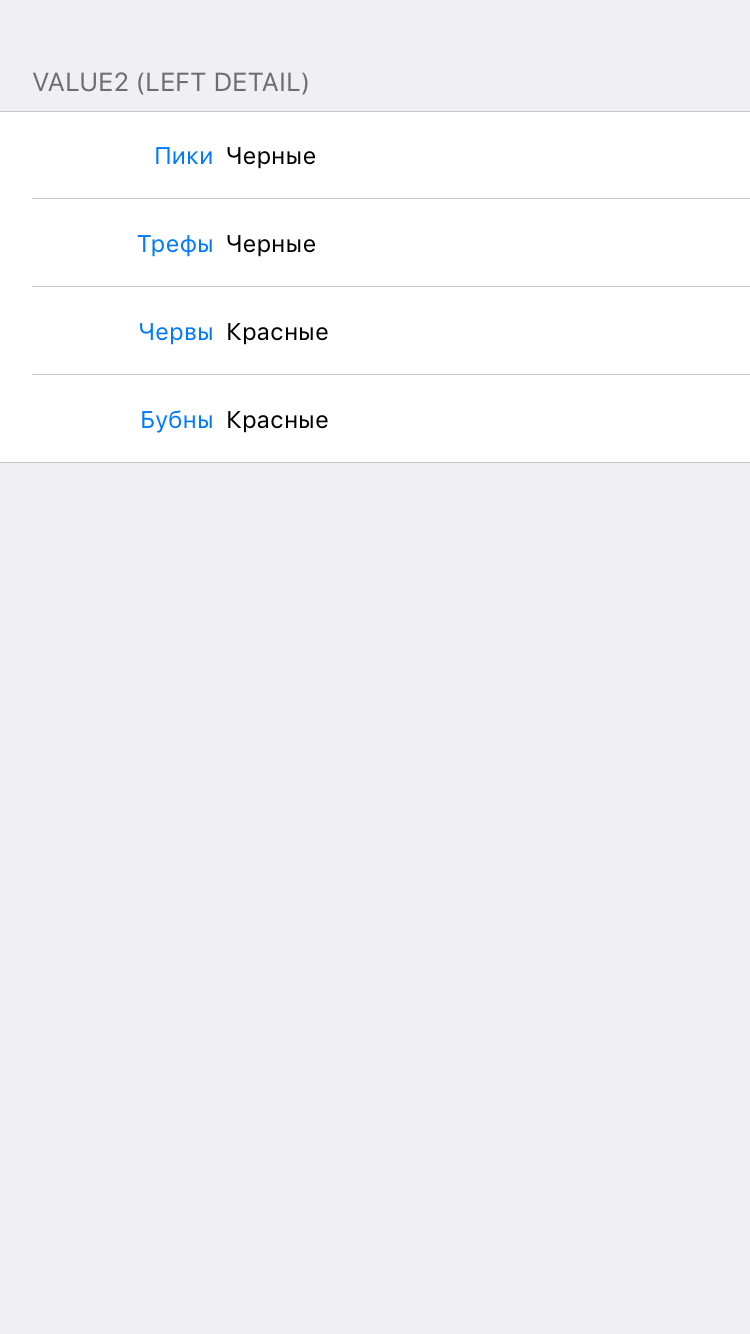
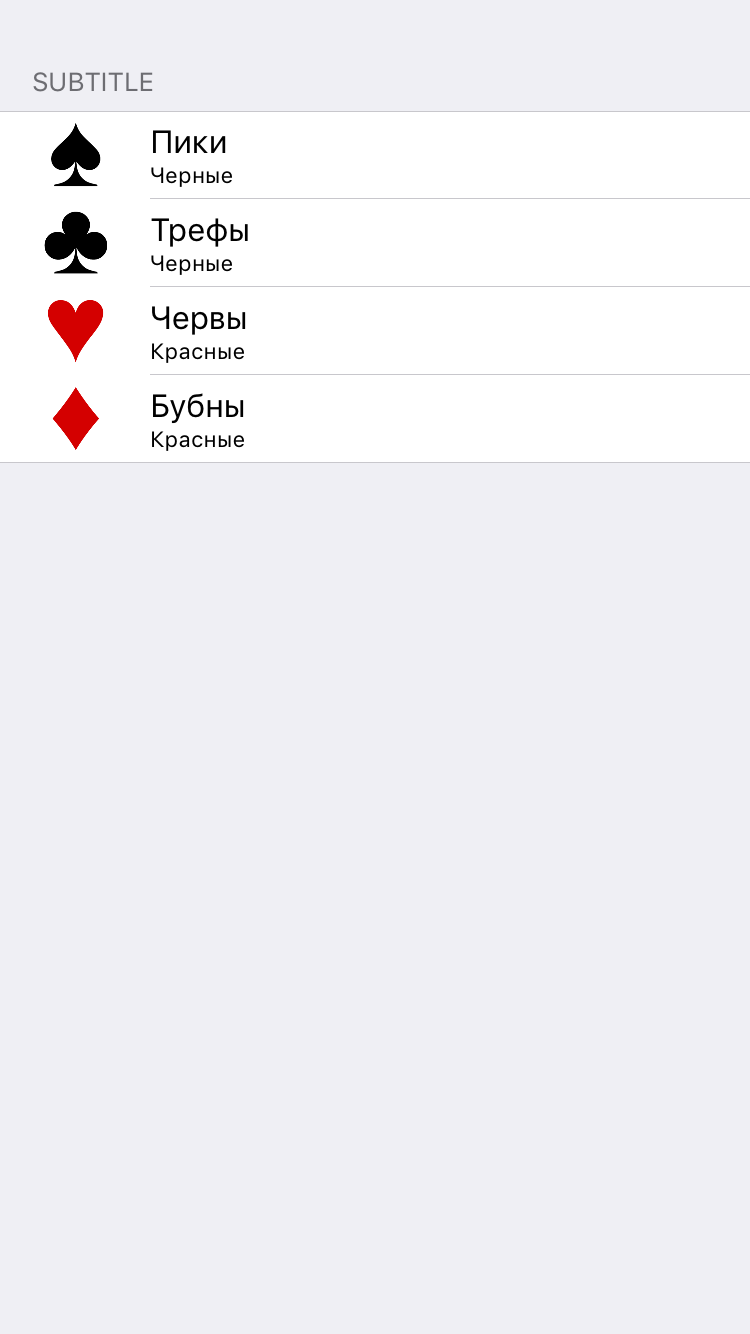
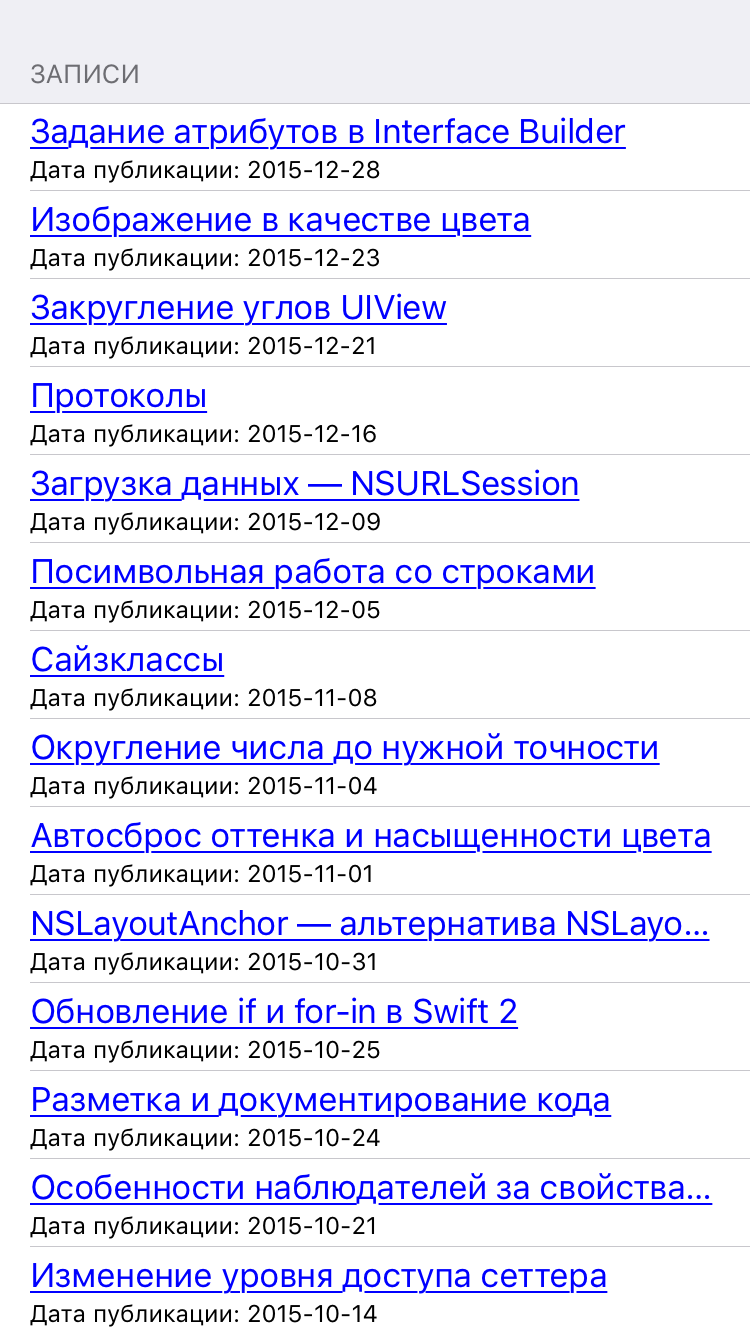
Все строки (ячейки) UITableView являются экземплярами своего класса UITableViewCell, и при инициализации также стилизуются: Default, Value1 (Right Detail), Value2 (Left Detail), Subtitle. Каждому стилю присущ свой набор областей для текста и изображений.
В соответствии с парадигмой MVC, графический интерфейс должен быть отделен от данных и логики, поэтому UITableView делегирует эти роли объектам dataSource и delegate, отвечающим протоколам UITableViewDataSource и UITableViewDelegate соответственно. Первый служит для задания порядка и количества секций и строк, возможностей их редактирования; второй — для настройки внешнего вида, функций выделения, перетаскивания и прочего.
Рассмотрим все это на конкретном примере. Создадим приложение, структурированно отображающее информацию из XML-файла.
import UIKit

class ViewController: UIViewController,
                      NSXMLParserDelegate,
                      UITableViewDelegate,
                      UITableViewDataSource {
    /*
    map.xml format:

    <sitemap>
        <article>
          <title>Задание атрибутов в Interface Builder</title>
          <url>http://valery.bashkatov.org/paper/setting-attributes-in-interface-builder</url>
          <date>2015-12-28</date>
        </article>

        <article>
          <title>Изображение в качестве цвета</title>
          <url>http://valery.bashkatov.org/paper/image-as-color</url>
          <date>2015-12-23</date>
        </article>
    </sitemap>
    */
    struct Article {
        var title: String
        var url: String
        var date: String
    }

    class UITableViewSubtitleCell: UITableViewCell {
        override init(style: UITableViewCellStyle, reuseIdentifier: String?) {
            super.init(style: .Subtitle, reuseIdentifier: reuseIdentifier)
        }

        required init?(coder aDecoder: NSCoder) {
            super.init(coder: aDecoder)
        }
    }

    var articles = [Article]()
    var xmlParser: NSXMLParser!
    var xmlCurrentElement = ""
    var tableView: UITableView!

    override func viewDidLoad() {
        super.viewDidLoad()

        // Create table view with grouped style
        tableView = UITableView(frame: CGRect(x: 0, y: 0, width: 0, height: 0), style: .Grouped)

        // Register UITableViewSubtitleCell class
        tableView.registerClass(UITableViewSubtitleCell.self, forCellReuseIdentifier: "cell")

        // Set delegate for UITableViewDelegate methods
        tableView.delegate = self

        // And data source for UITableViewDataSource methods
        tableView.dataSource = self

        view.addSubview(tableView)

        // Add constraints
        tableView.translatesAutoresizingMaskIntoConstraints = false
        tableView.centerXAnchor.constraintEqualToAnchor(view.centerXAnchor).active = true
        tableView.centerYAnchor.constraintEqualToAnchor(view.centerYAnchor).active = true
        tableView.widthAnchor.constraintEqualToAnchor(view.widthAnchor).active = true
        tableView.heightAnchor.constraintEqualToAnchor(view.heightAnchor).active = true

        // Create XML parser object
        let url = NSURL(string: "http://valery.bashkatov.org/files/uitableview-basics/map.xml")!
        xmlParser = NSXMLParser(contentsOfURL: url)!

        // For NSXMLParserDelegate methods
        xmlParser.delegate = self

        xmlParser.parse()
    }

    // Hide status bar
    override func prefersStatusBarHidden() -> Bool {
        return true
    }

    // MARK: - NSXMLParserDelegate methods
    // Called when detects a new tag
    func parser(parser: NSXMLParser,
                didStartElement elementName: String,
                namespaceURI: String?,
                qualifiedName qName: String?,
                attributes attributeDict: [String : String]) {

        xmlCurrentElement = elementName

        if elementName == "article" {
            articles.append(Article(title: "", url: "", date: ""))
        }
    }

    // Called when the text found inside tag
    func parser(parser: NSXMLParser, foundCharacters string: String) {

        // Since the text can come in parts, collect it
        switch xmlCurrentElement {
        case "title": articles[articles.count - 1].title += string
        case "url": articles[articles.count - 1].url += string
        case "date": articles[articles.count - 1].date += string
        default: return
        }
    }

    // Called when xml document was successfully parsed
    func parserDidEndDocument(parser: NSXMLParser) {
        tableView.reloadData()
    }

    // MARK: - UITableViewDataSource methods
    // Create and fill cells
    func tableView(tableView: UITableView,
                   cellForRowAtIndexPath indexPath: NSIndexPath) -> UITableViewCell {

        let cell = tableView.dequeueReusableCellWithIdentifier("cell", forIndexPath: indexPath)
        let row = indexPath.row

        // Title as link
        cell.textLabel!.attributedText = NSAttributedString(string: articles[row].title,
                                  attributes: [NSLinkAttributeName: articles[row].url])

        cell.detailTextLabel!.text = "Дата публикации: \(articles[row].date)"

        return cell
    }

    // Set cells count
    func tableView(tableView: UITableView, numberOfRowsInSection section: Int) -> Int {
        return articles.count
    }

    // Set section title
    func tableView(tableView: UITableView, titleForHeaderInSection section: Int) -> String? {
        return "Записи"
    }

    // Logic on row deleting
    func tableView(tableView: UITableView,
                   commitEditingStyle editingStyle: UITableViewCellEditingStyle,
                   forRowAtIndexPath indexPath: NSIndexPath) {

        if editingStyle == .Delete {
            articles.removeAtIndex(indexPath.row)
            tableView.deleteRowsAtIndexPaths([indexPath], withRowAnimation: .Automatic)
        }
    }
}
Кнопка удаления строки открывается свайпом влево.

Готовый проект доступен по ссылке: TableView.zip
Чтобы загрузка файлов не блокировалась политикой безопасности Xcode, нужно в Info.plist добавить группу App Transport Security Settings со свойством Allow Arbitrary Loads = YES.

Для изменения основных атрибутов Interface Builder предоставляет удобный графический интерфейс. Вместе с тем, в нем есть возможность задавать отсутствующие на панели свойства.
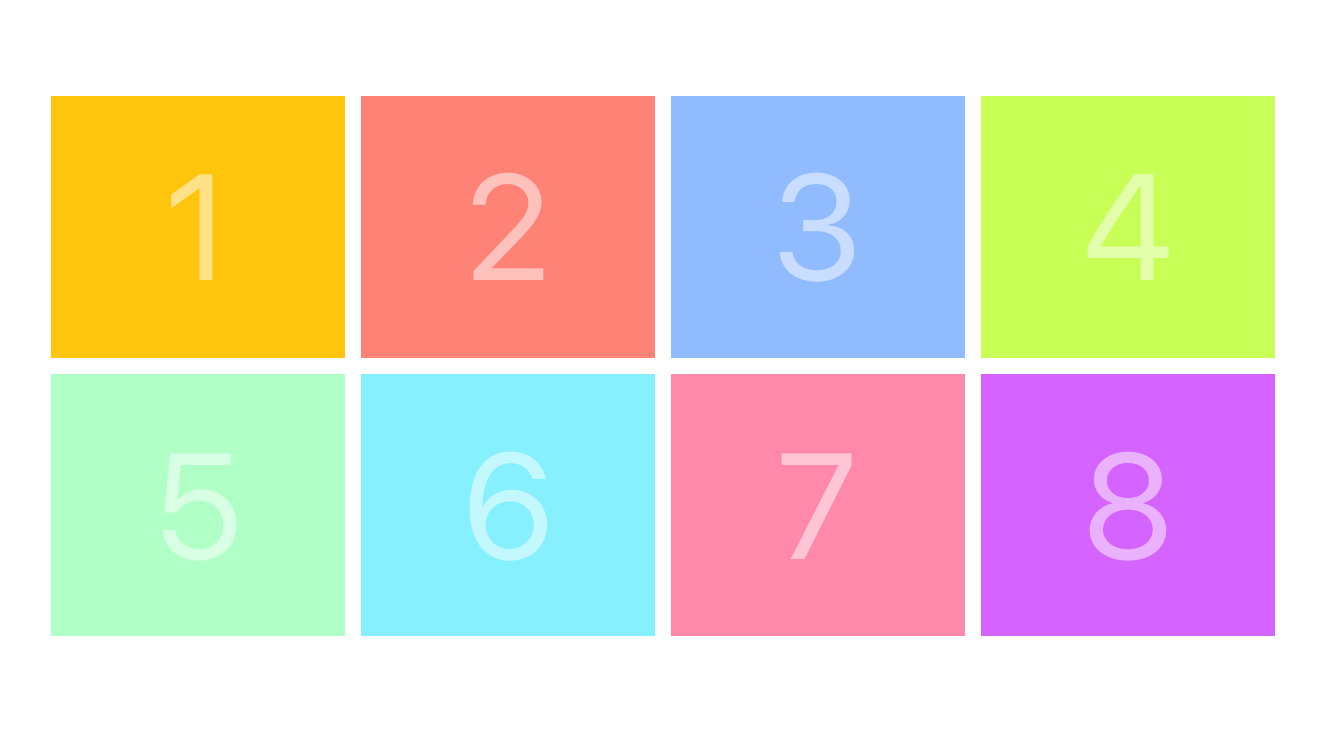
Создадим восемь объектов UIView.
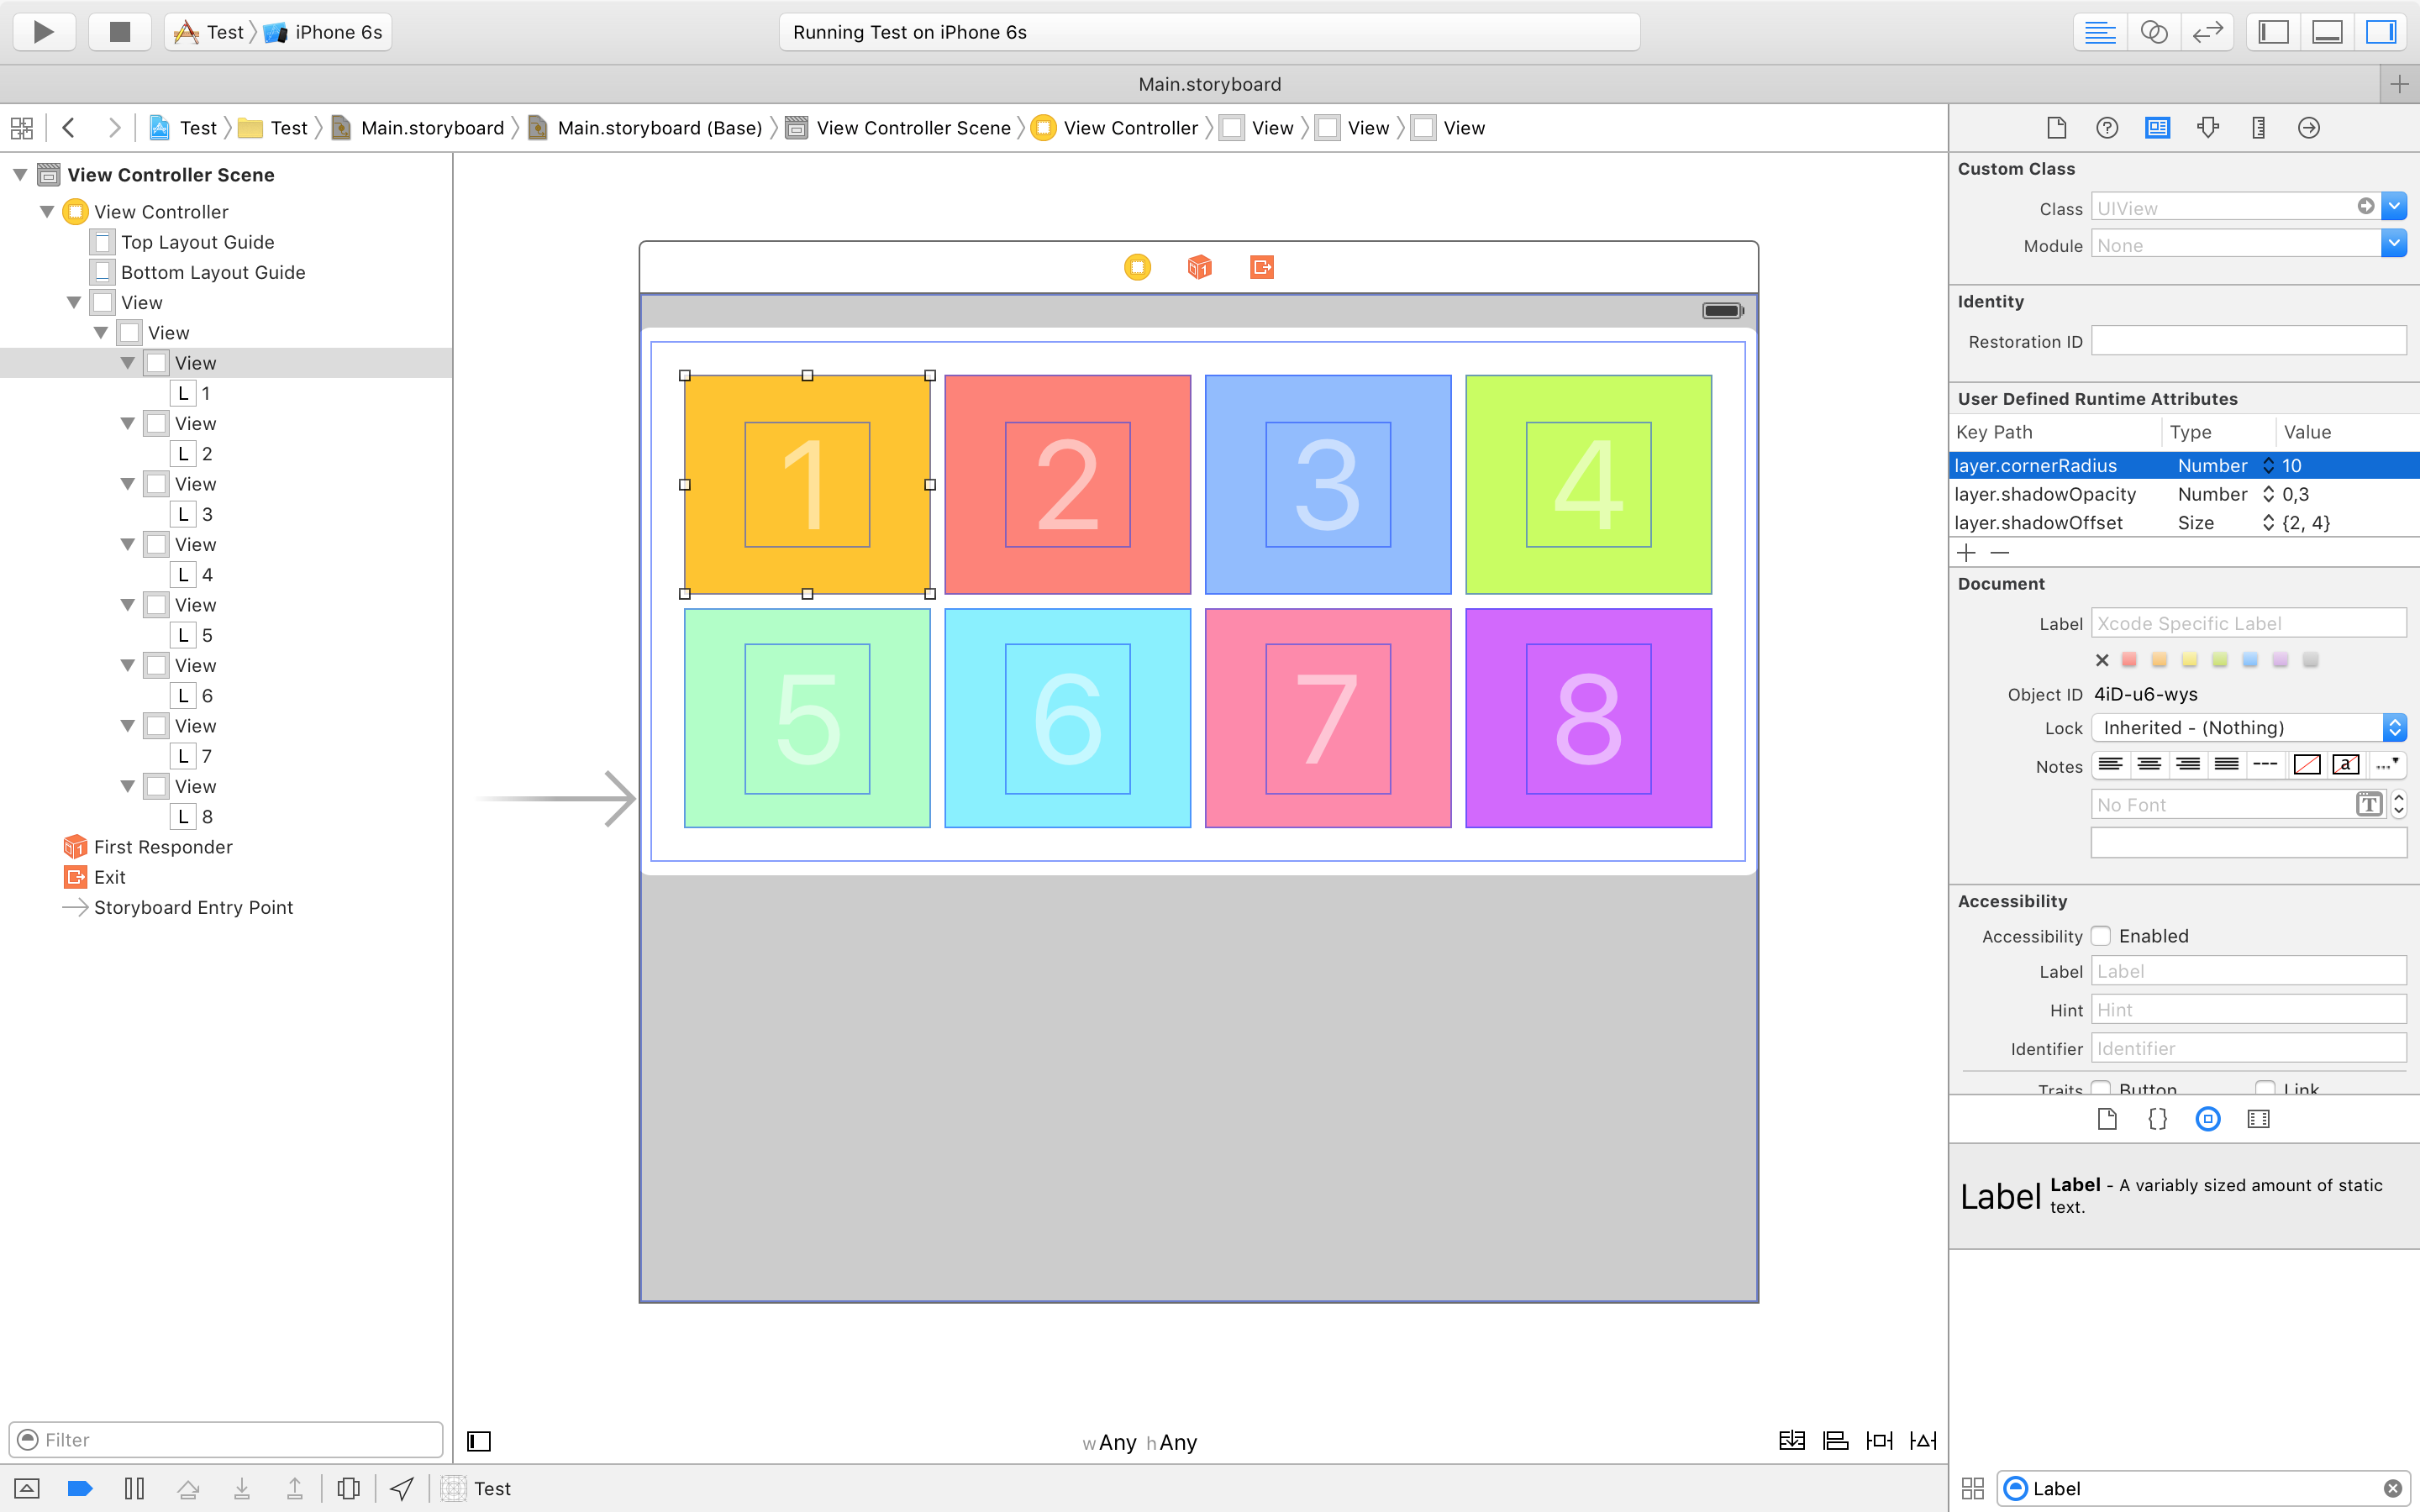
И добавим им тени, попутно закруглив углы. Так как нужные настройки производятся через свойство layer, недоступное в инспекторе атрибутов ( Attributes Inspector), переходим к инспектору идентификации (
 Identity Inspector), где напрямую прописываем значения в User Defined Runtime Attributes.
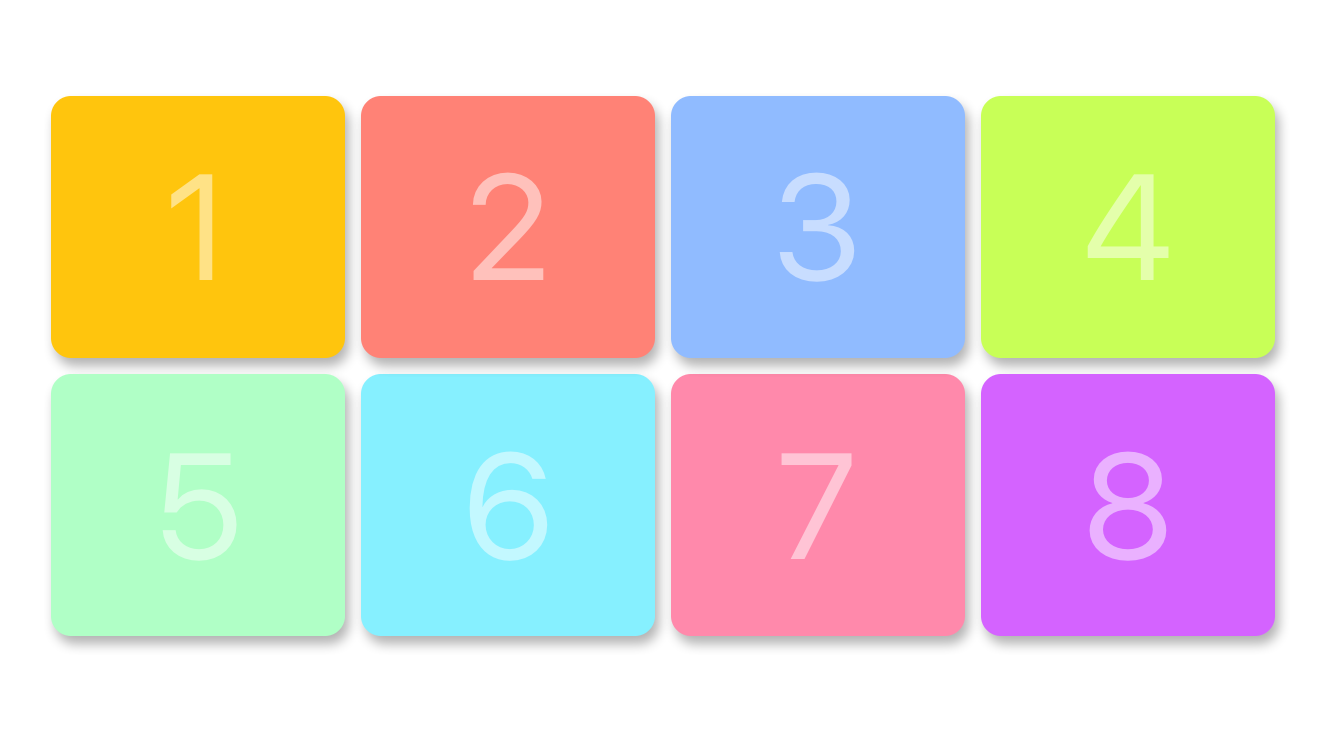
Запустив проект, увидим результат.
Однако у этого способа есть ограничения на типы выставляемых атрибутов. Они должны быть совместимы с приведенными в документации, за исключением имеющейся там ошибки, для Color верно не CGColor, а UIColor, поэтому установить, например, layer.shadowColor не получится.
Наряду с привычными способами, цвета UIColor могут создаваться на основе изображений UIImage. Такое бывает полезно, например, если нужно закрасить фон паттерном.
import UIKit

var view: UIView
var image: UIImage
var context: CGContext

// Draw pattern image using Core Graphics functions
UIGraphicsBeginImageContextWithOptions(CGSize(width: 20, height: 20), false, 0)

context = UIGraphicsGetCurrentContext()!

CGContextSetStrokeColorWithColor(context, UIColor(white: 0.5, alpha: 1).CGColor)
CGContextStrokeRectWithWidth(context, CGRect(x: 0, y: 0, width: 20, height: 20), 0.5)

image = UIGraphicsGetImageFromCurrentImageContext()

UIGraphicsEndImageContext()

view = UIView(frame: CGRect(x: 0, y: 0, width: 120, height: 120))

// Set view background as image color
view.backgroundColor = UIColor(patternImage: image)

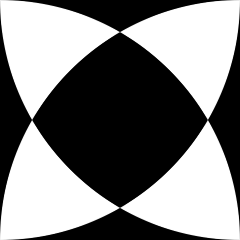
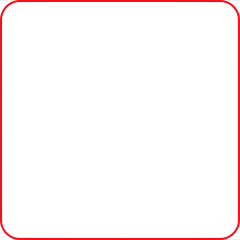
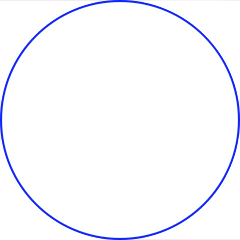
Изменение радиуса углов (cornerRadius), толщины (borderWidth) и цвета (borderColor) рамки объектов UIView доступно через свойство layer.
import UIKit
var view = UIView(frame: CGRect(x: 0, y: 0, width: 120, height: 120))
view.layer.borderWidth = 1
view.layer.cornerRadius = 10
view.layer.borderColor = UIColor.redColor().CGColor
 view.layer.cornerRadius = view.bounds.width / 2
view.layer.borderColor = UIColor.blueColor().CGColor
view.layer.cornerRadius = view.bounds.width / 2
view.layer.borderColor = UIColor.blueColor().CGColor
 view.layer.borderWidth = 0
view.layer.cornerRadius = view.bounds.width
view.backgroundColor = UIColor.blackColor()
view.layer.borderWidth = 0
view.layer.cornerRadius = view.bounds.width
view.backgroundColor = UIColor.blackColor()